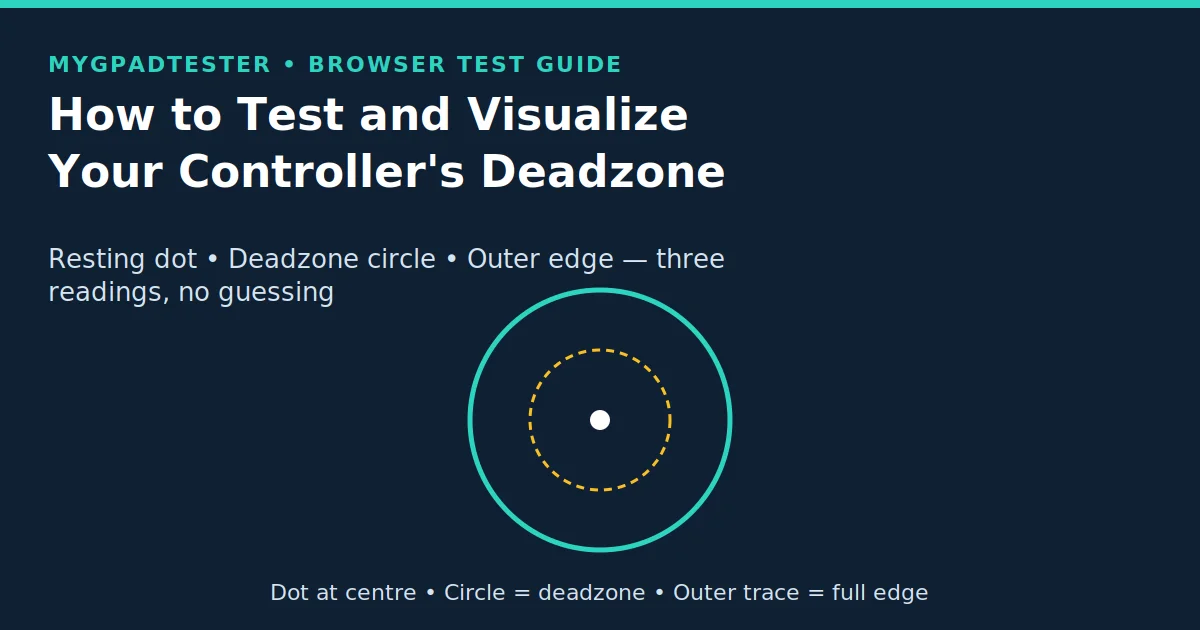
How to Test and Visualize Your Controller’s Deadzone
Subtitle: Visualize your deadzone free, in minutes: read the resting dot, the circle, and the outer edge, and set the smallest deadzone that actually works.
Meta line: Last updated 13 November 2026 | Category: Controller Testing Tools | Reading time: about 8 minutes | Tested with Chrome/Edge, Gamepad API
Supported controllers: PS5, Xbox, Switch, PC.
Your character moves on its own and you want to see the stick’s real position? Test it in minutes.
You already know what deadzone is from the foundation guide. It is the centre area a game ignores, so a resting stick does not move your character. This post does not repeat that foundation. Its job is practical. Read three things in order. Set a value that hides resting movement without killing fine aim. Prove it with a retest.
Quick Answer
Open the deadzone test, leave the stick untouched, and read the resting dot first. Then move the stick slowly to the edge and trace the outer circle. Set the inner deadzone just above the resting value, test left and right sticks separately, and retest. Do not raise both sticks because one drifts.
Tool CTA
Use our free deadzone test: big button, full width on mobile.
No download. No account. Data stays in your browser.
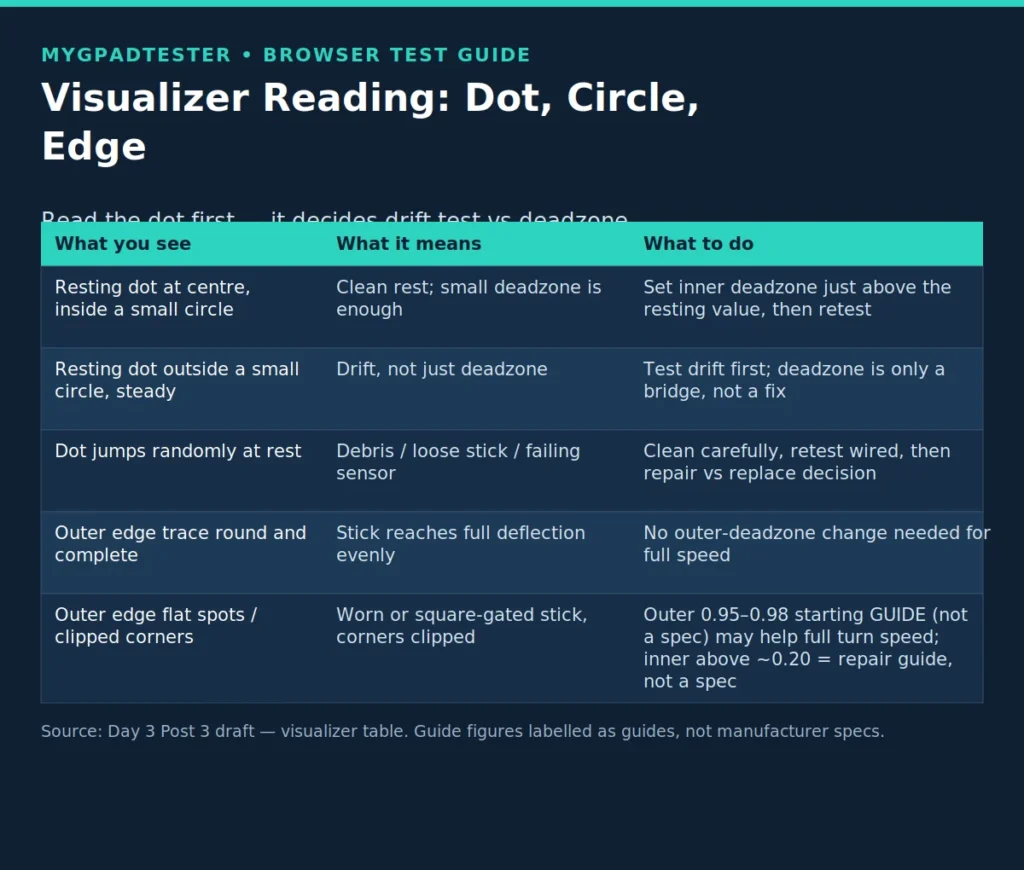
Data Table 1: How to read the visualizer
Caption: How to read the visualizer. The dot decides the next step: clean rest means set a small deadzone; steady offset means test drift first; clipped edge means check the outer setting. All values here are tester guides, not manufacturer specifications.
| What you see | What it means | What to do |
|---|---|---|
| Resting dot at centre, inside a small circle | Clean rest; small deadzone is enough | Set inner deadzone just above the resting value, then retest |
| Resting dot outside a small circle, steady in one direction | Drift, not just deadzone | Test drift first with the Stick Drift Test; deadzone is only a bridge, not a fix |
| Dot jumps randomly at rest | Debris / loose stick / failing sensor | Clean carefully, retest wired, then repair vs replace decision (later guide, not linked yet) |
| Outer edge trace is round and complete | Stick reaches full deflection evenly | No outer-deadzone change needed for full speed |
| Outer edge trace has flat spots / clipped corners | Worn or square-gated stick, corners clipped | Consider outer deadzone 0.95–0.98 as a starting guide so full turn speed triggers reliably without maximum force: labelled as a guide, not a spec |
Before you test: 4 setup rules
A visualizer reading is only as clean as the setup behind it. Get these four right before you record anything.
- Flat, stable surface, hands off for the rest reading. Put the controller down flat and do not touch either stick while you read the resting dot. A stick held in your hand, even lightly, is not at rest.
- Chrome or Edge on desktop first. Reference setup for this guide. Compare runs in the same browser, not across browsers, because other browsers may read the Gamepad API differently.
- Close remappers for the clean test. A remapper, Steam Input layer, or overlay that reshapes stick input will change what the visualizer shows. Run the clean test with those off. Do not mix a clean run and a remapped run into one conclusion.
- Test one stick at a time, record each separately. Left and right sticks wear, centre, and rest differently. A single number for “the controller” hides exactly the difference this guide is trying to find.
How the visualizer reads position: the browser reads stick position through the W3C Gamepad API, which reports each axis from −1.0 to 1.0 (Tier 1 specification: https://www.w3.org/TR/gamepad/). It plots that position as a dot, draws the deadzone circle, and traces the outer edge. It does not show the game’s final response curve: see the Limitations Box below.
How to test and visualize deadzone: the procedure
How to Test and Visualize Your Controller’s Deadzone
Total Time: 10 minutes
Step 1: Open the deadzone test and wake the controller.
Action: open the Stick Deadzone Test tool and press any button once. What you should see: the controller appears and the visualizer dot becomes live. If it fails: press a button again, try another USB port or cable, refresh in Chrome or Edge, and close remappers holding the controller. Do not record until the dot is live and steady.
Step 2: Leave both sticks untouched for 30-60 seconds and record the resting dot per stick.
Action: put the controller flat, hands off, and watch the resting dot for 30-60 seconds. Record left stick X/Y at rest and right stick X/Y at rest, separately. What you should see: on a clean stick, the dot sits at or very near the centre and stays there. This pair is your before number. If it fails: a dot steadily off-centre in one direction is a drift signal. Stop here for that stick and test drift first using the Stick Drift Test tool. A dot jumping randomly at rest points to debris, a loose stick, or a failing sensor. Clean carefully and retest wired. Do not set a large deadzone to hide random jumps.
Step 3: Move one stick slowly in a full circle to the edge and read the outer edge trace.
Action: take one stick only and move it slowly, in a full circle, all the way to the edge. What you should see: on a healthy stick, the trace is round and complete, reaching full deflection evenly. If it fails: flat spots or clipped corners mean the stick does not reach full deflection evenly. That is a wear signal, or a square-gated stick whose corners behave differently. Note where the flat or clipped part sits, by direction, before changing any setting. This is a short outer-edge reading note only, not the full circularity post. That guide comes later and is not linked here yet.
Step 4: Set the inner deadzone just above the resting value, using the starting method below.
Action: set the inner deadzone to the resting value plus a small margin. Starting method, labelled as a guide and not a manufacturer specification: resting value + 0.01, then test. Adjust only until resting movement stops, and keep the value as small as possible. What you should see: the resting dot now sits inside the deadzone circle and produces no movement in the tester. If it fails: if a small increase does not stop resting movement, do not keep raising the value in big steps. The problem is drift or wear, not the setting. Go back to the drift test instead.
Step 5: Test small tilts around the centre to confirm precision is still there.
Action: move the same stick in small, gentle tilts around the centre, the kind of movement you use for fine aim. What you should see: small tilts just outside the new deadzone still register, smoothly and in the right direction. If it fails: if small tilts now do nothing, the inner deadzone is too large. Lower it step by step and retest until rest movement is hidden and small tilts still work.
Step 6: Repeat steps 2-5 for the other stick separately. Do not copy the setting.
Action: run the full rest reading, edge trace, setting, and small-tilt check for the second stick. Use its own resting value. What you should see: a second, independent before/after pair for that stick. If it fails: do not copy the first stick’s value because it is quicker, unless both sticks genuinely have the same resting value. Copying wastes precision on the clean stick. And it may still be too small for the worn one.
Step 7: Retest after a restart or wired connection if the first result was borderline, and record the before/after pair.
Action: if the first result was borderline, restart, reconnect wired if you were wireless, and repeat the rest reading and small-tilt check with the same method. Borderline means a resting dot near the edge of the circle, a trace with a flat spot, or a value that only just hides movement. Record the pair: stick, resting value, deadzone set, connection, and browser. What you should see: the same verdict twice, on the same stick, with the same method. If it fails: if the second run contradicts the first, the sample was not clean. Check surface, hands-off rest, remappers, cable, and battery. Then retest before concluding anything.
This is the HowTo for this post. Each step gives the action, what you should see, and what it means if it does not happen that way. Work through all seven steps for one stick, then repeat for the other stick. Do not skip the retest: a single reading is a snapshot, not a setting decision.
Circle vs square: reading the shape on the visualizer
A circle reading treats distance the same in every direction. A square or cross shape means diagonals reach the edge differently from straight tilts. So a diagonal can feel different at the same tilt size. If diagonals feel wrong, check shape and axial handling before raising the size. Axial deadzone decides whether the X axis and the Y axis are judged separately or together. Raising size will not fix a shape problem. Full square-deadzone guidance for a specific game belongs to a future game-specific post that is not linked here yet. No per-game settings table is given here.
Smallest stable deadzone: the setting rule
Set the smallest value that hides resting movement in the tester and in a game, then stop. That is the whole rule. This guide records a before/after pair instead of handing you one universal number.
Raising further only loses fine aim precision. Once resting movement is hidden, there is nothing left for a larger deadzone to hide, except wear, which it cannot repair. If a small value does not hide movement, the problem is drift or wear, not the setting. Go back to the drift test. Do not keep raising deadzone.
If you need an inner deadzone above about 0.20 to hide movement, treat that as a stop rule, labelled as a tester guide and not a manufacturer specification. The stick is worn enough to repair, not just tune. That 0.20 figure is a guide threshold, not a vendor spec and not a guarantee about any particular controller model.
One separation sentence: deadzone is a position threshold, not timing. A stick that feels unresponsive at small tilts is a deadzone question. A stick that feels late is a lag question. That question is covered by the input-lag guides named in Next Steps, not repeated here.
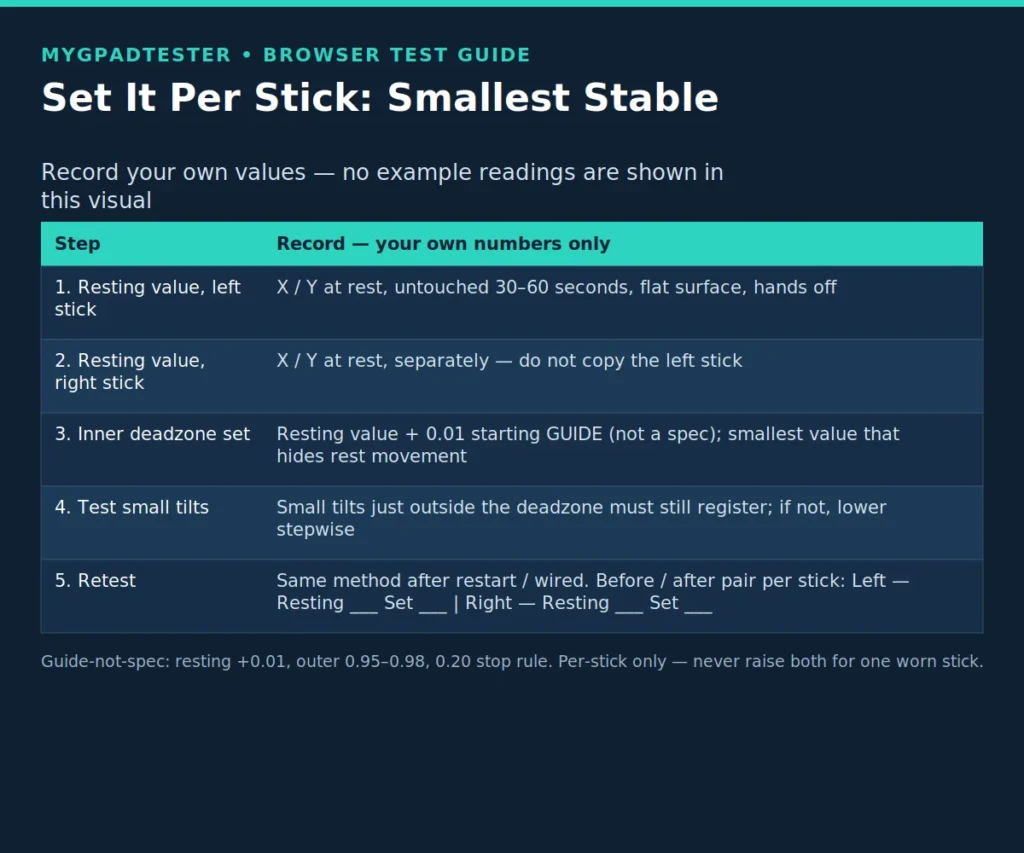
| Step | Record |
| Resting value, left stick | X / Y at rest, untouched 30-60 seconds |
| Resting value, right stick | X / Y at rest, untouched 30-60 seconds |
| Inner deadzone set, left | Smallest value that hides rest movement |
| Inner deadzone set, right | Set separately, do not copy left |
| Retest | Same method, after restart / wired, before vs after pair |
Limitations Box
What this test cannot tell you:
- A browser visualizer shows the Gamepad API position and the effect of a setting. It does not show the game’s final response curve, which can reshape the same deadzone in play. Check any tester value in the game you actually play.
- Deadzone values here are tester guides, not manufacturer specifications. The same number behaves differently per stick, per game, and per response curve, which is why this guide sets a value per stick by testing.
- The visualizer does not repair anything. It shows drift and lets you set a deadzone bridge. It does not fix a worn potentiometer, Hall effect sensor, or TMR sensor.
- Retest after any firmware, game, or platform setting change. A value that was smallest and stable before a change may not be afterwards.
Troubleshooting
Caption: Troubleshooting table. Change one variable at a time, then retest. Never declare a controller broken from one number.
| Problem | Cause | Fix |
|---|---|---|
| Resting dot steady outside the circle | Drift, not deadzone size | Test drift first using the Stick Drift Test tool; deadzone is a bridge only |
| Dot jumps randomly at rest | Debris / loose stick / failing sensor | Clean carefully, retest wired, then consider repair vs replace (later guide, not linked yet) |
| Small tilts do nothing after setting | Inner deadzone too large | Lower it step by step and retest small tilts until precision returns |
| Full speed needs maximum force | Outer deadzone too large | Lower outer deadzone step by step and re-check the outer edge trace |
| One stick only is affected | Per-stick wear or centring difference | Set that stick only; do not raise both sticks |
| Numbers differ between game and tester | Game response curve or game deadzone setting | Check the game’s own settings; the tester does not show the game’s final curve |
| Feels late, not unresponsive | Lag, not deadzone | Check lag separately with the Input Lag Test tool; do not raise deadzone to fix lateness |
Related Tools
This post supports: Stick Deadzone Test (pillar, highlighted).
All 8 homepage tools, desktop 4 columns / tablet 2 / mobile 1, tap target at least 44px. Grid links, all confirmed existing:
- Gamepad Health Checker: https://mygpadtester.com/gamepad-health-checker/
- Button Test: https://mygpadtester.com/button-test/
- Input Lag Test: https://mygpadtester.com/input-lag-test/
- Stick Drift Test: https://mygpadtester.com/stick-drift-test/
- Trigger Test: https://mygpadtester.com/trigger-test/
- Vibration Test: https://mygpadtester.com/vibration-test/
- Stick Deadzone Test (pillar): https://mygpadtester.com/stick-deadzone-test/
- Polling Rate Test: https://mygpadtester.com/polling-rate-test/
Related Guides
- Pillar first: Stick Deadzone Test: https://mygpadtester.com/stick-deadzone-test/, anchor: “use our free deadzone test”
- Same-silo: What Is Controller Deadzone?: https://mygpadtester.com/what-is-controller-deadzone/ (the deadzone foundation post)
- Exactly 1 related-silo link: Stick Drift Test: https://mygpadtester.com/stick-drift-test/, anchor: “if the resting dot is outside a small deadzone, test drift first”
- Next in this series: none added: only if that post is actually published at publishing time; otherwise omit, do not link a future slug.
Other internal links used in the body (all confirmed existing in the brief):
- Gamepad Health Checker (Next Steps only): https://mygpadtester.com/gamepad-health-checker/
About the Author
Marcus Sterling, Lead Engineer & Founder, MyGpadTester, Austin, Texas, USA
Marcus Sterling is a Certified Hardware Analyst with over 12 years of hands-on experience in gaming peripheral diagnostics. He is professionally certified by iFixit as a Master Tech, and has spent years analyzing Hall Effect sensors to solve the industry’s stick drift crisis. He built MyGpadTester to give every gamer the same pro-level diagnostic tools he uses on his own workbench.
Affiliations: Associate Member of IEEE (Consumer Electronics Society) · Specialization: Advanced TMR Magnetic Sensor Calibration & Latency Testing · Former: Lead Tech at Performance Labs TX in Austin · Certifications: ESD Professional & Master Hardware Diagnostic Certified
Tests follow the MyGpadTester methodology: same browser, same connection, wired first, retest before deciding. Results are browser estimates via the W3C Gamepad API, not lab measurements.
Author Profile Page · About · How We Test · Contact · X (Twitter)
No photo. No other social link.
Frequently Asked Questions
How do I test my controller deadzone?
Open the deadzone test and leave the stick untouched 30–60 seconds. Read the resting dot. Trace the outer edge. Set the smallest deadzone that hides rest movement. Retest each stick separately.
What does the deadzone circle mean?
It is the centre area the game ignores. Inside the circle: ignored. Outside: counted. The resting dot must sit inside it when the stick is untouched.
What deadzone should I set?
The smallest value that hides your resting movement in the tester and in a game, set per stick separately. Start from resting value plus a small margin, then test. Do not copy one universal number.
Should both sticks use the same deadzone?
No, unless both sticks have the same resting value. Test and set left and right sticks separately; raising both because one drifts wastes precision on the clean stick.
Why does my stick not reach full speed at the edge?
Outer deadzone may be too large, or the outer edge trace may be clipped/flat. Lower outer deadzone step by step and re-check the trace. A starting guide for clipped corners is outer deadzone 0.95–0.98, labelled as a guide, not a spec.
Does a visualizer fix stick drift?
No. It shows drift and lets you set a deadzone bridge. It does not repair a worn sensor. If you need a large deadzone to hide movement, the stick needs repair, not just tuning.
Why does my deadzone reading differ between the game and the tester?
Because the game applies its own deadzone setting and response curve, and the tester does not show the game final response curve. Check the settings in the game itself, and check any tester value in the game you actually play.
Next Steps
End of post only. No affiliate links.
- If deadzone is set and drift is mild: monitor and retest with the same method. Full deadzone and game-specific guides come later and are not linked here yet.
- If drift is clear: use the Stick Drift Test tool linked above. The later drift fix and repair posts are not linked here yet.
- If it feels late rather than unresponsive: use the Input Lag Test tool linked above. Lag is a timing question, not a deadzone question.
- The future dedicated Deadzone Visualizer tool and the full circularity post are not linked here until they are published. This post is about using the existing Stick Deadzone Test tool’s visualizer, not about a new tool.