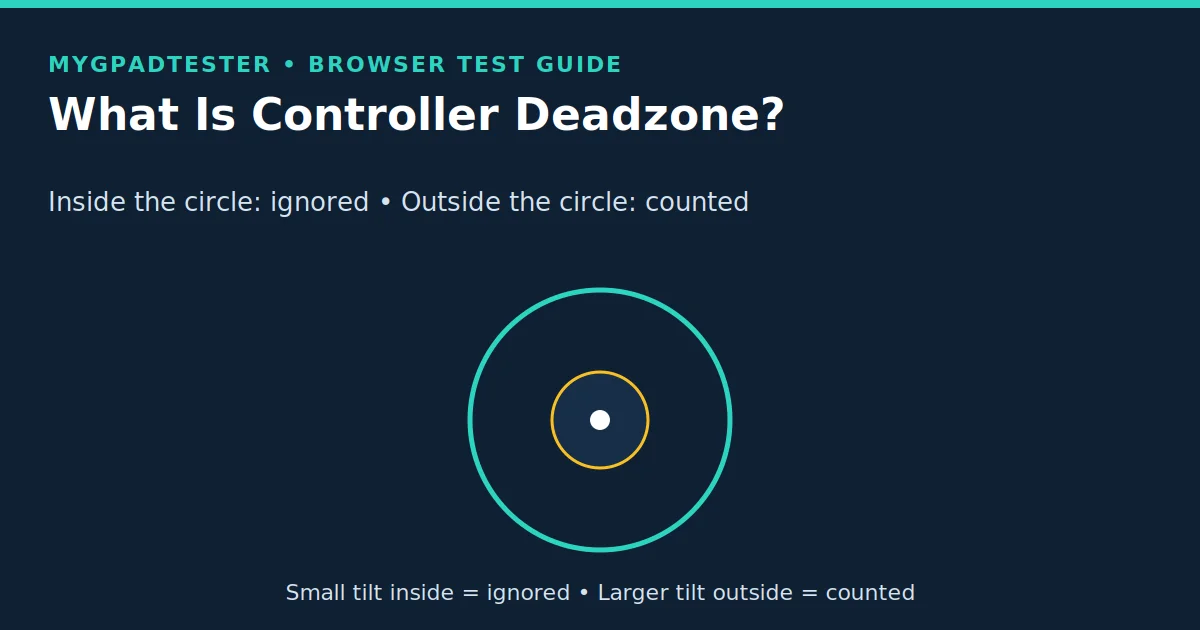
What Is Controller Deadzone?
Subtitle: Deadzone is the small centre area a game ignores. A resting stick does not move your character. Small tilts do not feel twitchy. Free, no download.
Meta line: Last updated 14 November 2026 | Technical Guides | Reading time: about 8 minutes | Tested with Chrome/Edge, Gamepad API
Supported controllers strip (plain text): PS5 · Xbox · Switch · PC
You tilt the stick slightly and nothing happens, then it jumps? Your deadzone is too large.
Quick Answer
Controller deadzone is the range of stick movement around the centre that a game ignores. A small inner deadzone stops a resting stick’s tiny sensor noise from moving your character. A larger deadzone hides more movement, but it also makes small, precise tilts unresponsive. Deadzone hides drift: it does not repair it.
Tool CTA
No download. No account. Data stays in your browser.
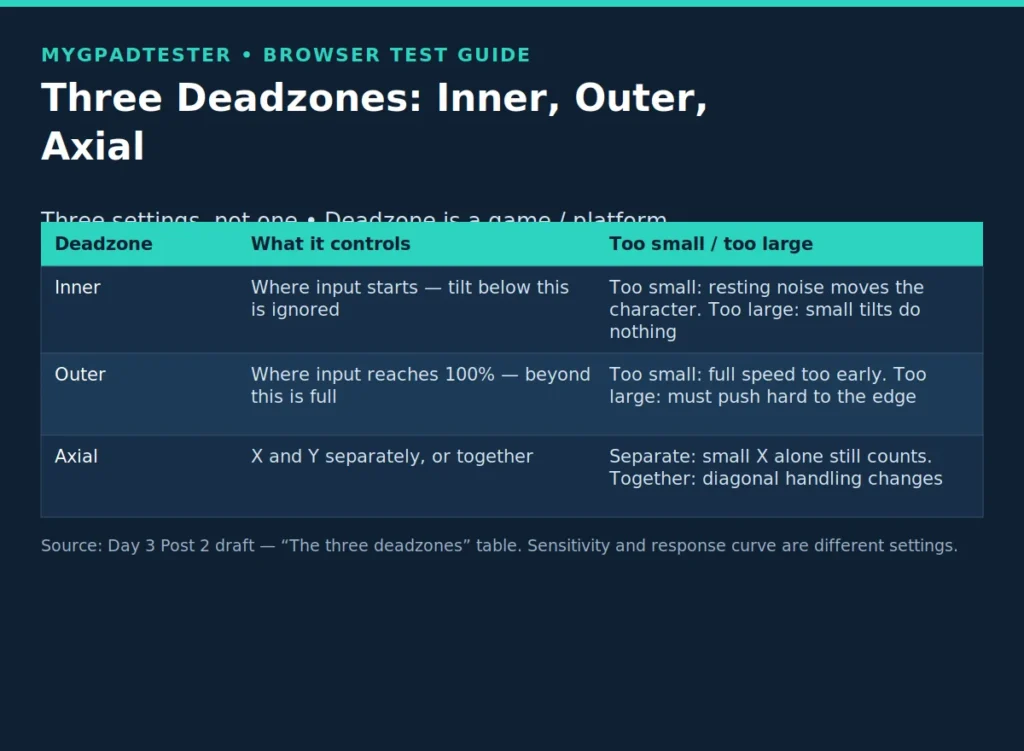
Data Table 1: The three deadzones
| Deadzone | What it controls | What happens if it is too small / too large |
|---|---|---|
| Inner deadzone | Where input starts: tilt below this is ignored | Too small: resting noise / mild drift moves the character. Too large: small precise tilts do nothing, aim feels dead in the centre |
| Outer deadzone | Where input reaches 100%: tilt beyond this is treated as full | Too small: full speed with little tilt, hard to control finely. Too large: you must push to the edge with force to reach full speed |
| Axial deadzone | Whether X and Y are treated separately or together | Separate (axial): a small X tilt alone still counts, even if Y is centred. Together: diagonal handling changes, and straight vs diagonal feel differs |
Table caption: Deadzone sets the start point. Sensitivity sets how fast input grows after it. Response curve sets the shape of that growth. They are three different settings: changing one does not replace the others.
Why a resting stick needs a deadzone at all
A controller stick never reports a perfect zero at rest. Its sensor reports tiny values even with your thumb off the stick. That comes from sensor noise. In some sticks, small variation in the centering spring can also add to it (Tier 3, typical, not a vendor specification). The W3C Gamepad API reports stick axes from −1.0 to 1.0 (Tier 1). So even a tiny resting value is a real number the game can see.
Without any deadzone, that noise would move a character, drift a camera, or nudge an aim point untouched. A small inner deadzone is therefore normal, not a fault. The game filters noise before it becomes movement. The Day 1 house range for normal resting noise is ±0.02–0.03, a house tester convention, not a Sony, Microsoft, or Nintendo specification.
That is the whole job of a deadzone: ignore the centre, count the rest.
Inner vs outer vs axial, in plain words
Think of a stick’s travel from the centre to the edge. Inner deadzone decides where that travel starts to count. Outer deadzone decides where it reaches full speed. Axial deadzone decides whether the X axis and the Y axis are judged separately or together.
Inner deadzone is the one most players mean by “deadzone”. At 0.05, the first 5% of tilt from the centre does nothing. That helps when a stick rests slightly off-centre. But it harms fine aim when set so high that small tilts never register at all. Small tilts include nudging a crosshair and creeping around a corner.
Outer deadzone is the opposite end. At 0.95, you reach 100% input at 95% of full tilt, so the last 5% of travel adds nothing. A low outer deadzone makes full speed arrive early and feel twitchy. A high one forces you to push hard to the edge. A worn stick that no longer reaches the edge can feel as if it never reaches full speed.
Axial deadzone is the subtlest of the three. With it, X and Y are treated separately. A small tilt purely to the left still counts as X movement even if Y is centred. Without it, the game judges the combined tilt. So diagonals may be treated differently from straight movements. If straight movements feel clean but diagonals feel odd, shape and axial handling are the first suspects. Deadzone size alone is not.
Deadzone shape: circle vs square vs cross
Shape decides whether the ignored area is the same distance in every direction, and that is why diagonals can feel different from straight movements. Size is only half the story.
A circle ignores the same distance in every direction. Push 0.05 straight or diagonally and the same rule applies, so straight and diagonal tilts behave the same way at the same distance from the centre.
A square or cross shape changes how diagonals behave. A diagonal tilt reaches the edge sooner in a square shape than a straight tilt does. Imagine a square drawn around the centre. The corners of that square are farther from the centre than the middles of its sides. A diagonal push heads toward a corner. So it can cross the boundary earlier than a straight push of the same length. The result is that diagonals can feel faster. They can also reach full input differently from straight movements, even with the same deadzone number.
That is why some games, in particular Rocket League, care about shape, not just size. Full square-deadzone game guidance belongs to a future game-specific post, so it is not covered here. Shape does not change the stick itself: it changes how the game reads its position.
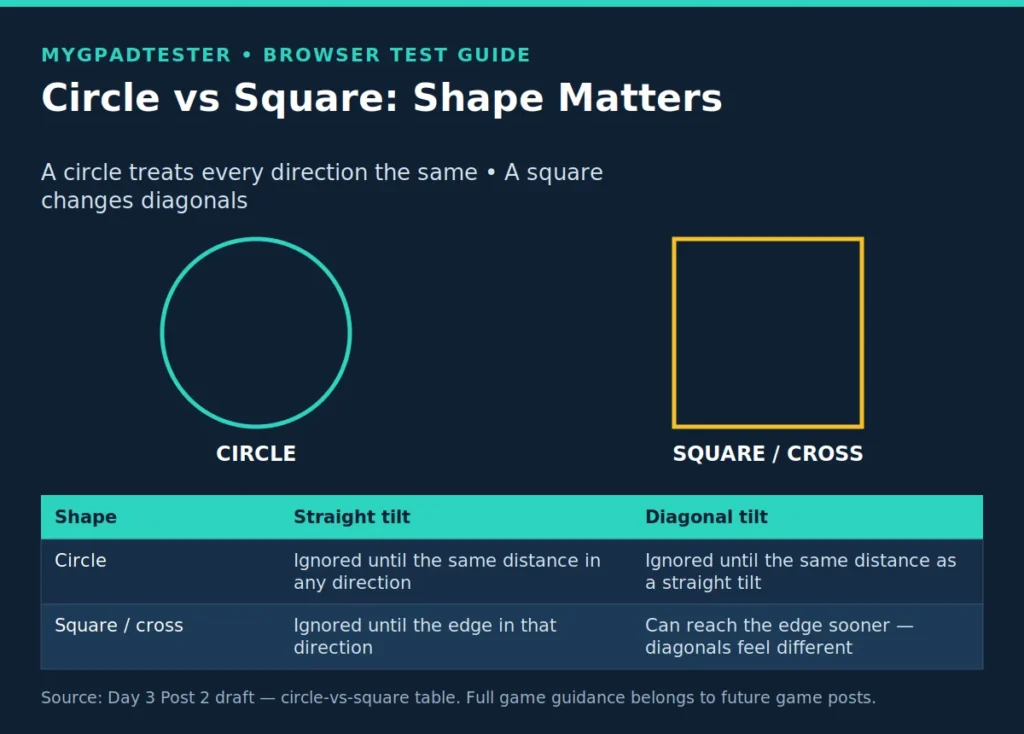
| Shape | Straight tilt | Diagonal tilt |
|---|---|---|
| Circle | Ignored until the same distance in any direction | Ignored until the same distance as straight tilt |
| Square / cross | Ignored until the edge in that direction | Can reach the edge sooner than a straight tilt, so diagonals feel different |
Deadzone vs sensitivity vs response curve: do not confuse them
These three settings are often changed as if they were one setting. They are not, and changing the wrong one will not fix the problem you actually have.
Deadzone is where input starts. It draws the ignored centre and says, in effect, “nothing below this line counts.”
Sensitivity is how much input grows per tilt after the deadzone. If aim overshoots, the fix may be sensitivity, not deadzone. The input was already getting through, it was simply growing too fast.
Response curve is the shape of that growth. A linear curve grows evenly: twice the tilt gives twice the input. A dynamic or standard curve, shaped by the game, grows unevenly. Two players with the same deadzone and sensitivity can still feel different if their response curves differ.
A short rule for diagnosis: if a resting stick moves, start with a drift test, not a bigger deadzone. If small tilts do nothing, suspect inner deadzone. If aim overshoots once it does move, suspect sensitivity or response curve. If it feels late rather than unresponsive, that is a different problem. Deadzone ignores small tilts, while lag delays input that does get through. The lag chain is covered in the Day 2 input-lag foundation post What Is Controller Input Lag?.
Deadzone vs drift: the bridge rule
If your stick moves at rest, test drift first before you raise deadzone. Use the Stick Drift Test tool linked above. Raising deadzone from 0.05 to 0.15, the Day 1 bridge example, will stop visible movement from mild drift. But you lose fine aim precision. And the wear is still there. Use deadzone as a bridge while you decide on cleaning, calibration, or repair, not as a cure. The setting hides the symptom. It does not repair a worn potentiometer, a damaged carbon track, or a failing Hall effect or TMR sensor.
One stop rule, labelled clearly as a tester guide and not a manufacturer specification. If you need an inner deadzone above about 0.20 to hide movement, the stick is worn enough to repair, not just tune. That 0.20 figure is a guide for deciding when tuning stops being sensible. It is not a Sony, Microsoft, or Nintendo specification.
Where deadzone actually lives by platform: a decision table, not a manual
Deadzone is a game or platform setting, not a universal hardware specification. The same number behaves differently in different games because their response curves differ. This table is a decision guide, not a manual. Exact menu wording varies. The platform rows below are checked against each platform’s own support pages; any row that cannot be pinned to a support page stays worded as a general pointer to the platform’s controller settings.
| Platform | Where the setting lives | What it controls | What it cannot fix |
|---|---|---|---|
| PS5 standard DualSense | No system-level deadzone slider; DualSense Edge profiles are the exception | Per-profile deadzone on Edge, otherwise the game’s own setting | Wear on a standard DualSense stick. A setting cannot repair the sensor |
| Xbox (Elite Series 2 only for app deadzone) | Xbox Accessories app profiles for Elite Series 2; standard Xbox controllers use the game’s own setting | Per-profile deadzone on Elite Series 2 | Wear, or a game that overrides the profile with its own setting |
| Steam | Steam Input per-game deadzone | Deadzone per game, per controller, through Steam Input | Wear, or a game played outside Steam Input with its own setting |
| Switch | Stick calibration, not a deadzone slider | Calibration of the stick’s centre and range | Wear, or drift that calibration cannot centre out |
Two readings matter more than any single number. If your resting value is above 0.05 on the Day 1 house scale, no setting fixes wear: it can only hide it. If it is below 0.02, you can safely run a low deadzone. Between those points, deadzone is a judgement call to test, not a number to copy.
As a starting guide only (Tier 3 tester guide, not a vendor specification), start inner deadzone from your resting value plus 0.01, and outer deadzone from 0.95 to 0.98, then test and adjust per stick.
A short diagnostic pointer (not a procedure HowTo)
This pointer only tells you which problem you have:
- Rest value: does the stick sit still at rest, or report movement untouched? Movement at rest points to drift, not deadzone.
- Small-tilt response: does a tiny tilt register, or nothing until you push further? Nothing at small tilts points to inner deadzone being too large.
- Edge response: do you reach full speed well before the edge, or only by forcing the stick to it? That points to outer deadzone.
If the first pointer shows movement at rest, use the drift fork above before changing any setting. If it is clean, deadzone is the suspect, and the deadzone test guide will show how to set the smallest stable value per stick.
Limitations Box
What this explanation cannot tell you
- Deadzone values are game and platform settings, not a universal hardware specification. The same number behaves differently in different games because response curves differ.
- A deadzone setting cannot repair a worn potentiometer, Hall effect sensor, or TMR sensor. It also cannot restore a centering spring that no longer centres the stick. A weak centering spring is a Tier 3 typical cause, not a vendor documented cause.
- A browser visualizer shows the setting’s effect on reported stick position, not the game’s final response curve, aim assist, or in-game feel.
- No deadzone number here is a “best” setting. Game-specific settings belong to future posts, labelled as starting points to test, not guarantees.
Troubleshooting / fork table
| Problem | Likely cause | What to do |
|---|---|---|
| Moves at rest | Drift, not deadzone | Test drift first with the Stick Drift Test tool; do not just raise deadzone |
| Clean at rest, but small tilts do nothing | Inner deadzone too large | Lower inner deadzone and retest; do not copy another player’s number |
| Full speed too early, hard to control finely | Outer deadzone too small | Raise outer deadzone and retest at the edge |
| Diagonals feel wrong, straight movements feel fine | Shape (circle vs square) or axial handling, not just size | Check shape and axial settings, not only the deadzone number |
| Feels late, not unresponsive | Lag, not deadzone | Check the lag chain separately; deadzone ignores small tilts, lag delays input that gets through |
| One stick behaves differently from the other | Per-stick wear or setting | Test and set each stick separately; do not raise both because one is worn |
Related Tools
This post supports: Stick Deadzone Test
- Gamepad Health Checker: https://mygpadtester.com/gamepad-health-checker/
- Button Test: https://mygpadtester.com/button-test/
- Input Lag Test: https://mygpadtester.com/input-lag-test/
- Stick Drift Test: https://mygpadtester.com/stick-drift-test/
- Trigger Test: https://mygpadtester.com/trigger-test/
- Vibration Test: https://mygpadtester.com/vibration-test/
- Stick Deadzone Test (pillar, highlighted): https://mygpadtester.com/stick-deadzone-test/
- Polling Rate Test: https://mygpadtester.com/polling-rate-test/
Homepage, in grid only: https://mygpadtester.com/
Related Guides
- Pillar first: Stick Deadzone Test: https://mygpadtester.com/stick-deadzone-test/
- Same-silo, confirmed live 27 Oct 2026: What Is Controller Input Lag?: https://mygpadtester.com/what-is-controller-input-lag/ (Technical Guides, matches the lag vs deadzone distinction in Troubleshooting). Day 1 polling is also a Technical Guides post and is confirmed live, but it is not forced here because no polling/lag distinction sentence in this post requires it as a link; the lag distinction is given in text only above.
- Exactly 1 related-silo link: Stick Drift Test: https://mygpadtester.com/stick-drift-test/ (“test drift first before you raise deadzone”).
- Next in this series: How to Test and Visualize Controller Deadzone.
About the Author
Marcus Sterling, Lead Engineer & Founder, MyGpadTester, Austin, Texas, USA
Marcus Sterling is a Certified Hardware Analyst with over 12 years of hands-on experience in gaming peripheral diagnostics. He is professionally certified by iFixit as a Master Tech, and has spent years analyzing Hall Effect sensors to solve the industry’s stick drift crisis. He built MyGpadTester to give every gamer the same pro-level diagnostic tools he uses on his own workbench.
Affiliations: Associate Member of IEEE (Consumer Electronics Society) · Specialization: Advanced TMR Magnetic Sensor Calibration & Latency Testing · Former: Lead Tech at Performance Labs TX in Austin · Certifications: ESD Professional & Master Hardware Diagnostic Certified
Tests follow the MyGpadTester methodology: same browser, same connection, wired first, retest before deciding. Results are browser estimates via the W3C Gamepad API, not lab measurements.
Author Profile Page · About · How We Test · Contact · X (Twitter)
Frequently Asked Questions
What is controller deadzone?
The centre area of stick movement that a game ignores, so resting sensor noise does not move your character.
What is a good deadzone setting?
Start low if your stick is clean at rest (below 0.02). Raise only enough to hide a steady resting offset. There is no single universal number: it depends on your stick’s resting value, the game, and its response curve. Set it by testing with the full test guide, not by copying one number.
Does deadzone fix stick drift?
No, it hides it. It stops visible movement from mild drift, but reduces fine aim precision and does not repair the sensor.
What is the difference between inner and outer deadzone?
Inner is where input starts; outer is where input reaches 100%. Inner controls the centre, outer controls the edge.
What is the difference between deadzone and sensitivity?
Deadzone sets the start point; sensitivity sets how fast input grows after that point. Changing sensitivity does not replace a deadzone fix, and vice versa.
Why do diagonals feel different from straight movements?
Deadzone shape. A circle treats every direction the same distance; a square/cross shape changes diagonal behaviour, so diagonals can reach full input differently from straight tilts.
Does deadzone add input lag?
No. Deadzone ignores small tilts that fall inside the centre area. Lag delays input that does get through. If movement feels late rather than unresponsive, check the lag chain separately.
Next Steps (end only, no affiliate links)
If you need to set your own deadzone, the deadzone test guide will show how to set the smallest stable value. It will also show how to retest left and right sticks separately.
If drift is confirmed, use the Stick Drift Test. The drift fix and repair guides come later and are not linked here yet.
If it feels late rather than unresponsive, use the Input Lag Test. That is a timing problem, not a deadzone problem.
The Gamepad Health Checker is the screening test if more than one input feels wrong at once. It is linked in the tools grid above.