PS5 DualSense Stick Drift Fix
Meta line: Last updated 13 November 2026 | Category: Controller Testing Tools | Reading time: about 12 minutes | Tested with Chrome/Edge, Gamepad API
Your DualSense character or camera moves on its own, even with your hands off the sticks, so fix it in order: test, clean, calibrate, retest, then decide repair or replacement.
Quick Answer
Test the DualSense flat and untouched for 30 to 60 seconds first. If the resting offset is steady at 0.05 or higher in the same direction, work through clean, calibrate and retest in that order. Cleaning helps debris, not worn hardware. Check warranty before you open anything.
PS5 or Xbox, which guide? This guide is for the PS5 DualSense only. If your drifting controller is an Xbox Series X or S pad, use the Xbox guide instead: Xbox Series X/S Stick Drift Fix, https://mygpadtester.com/xbox-series-stick-drift-fix/. The fix order is the same in both guides. Only the calibration step is different, because the PS5 and Xbox use different menus.
Tool CTA
Start with a number, not a guess. A before number makes every later step easy to judge.
Test your DualSense drift free
No download. No account. Data stays in your browser.
Use the link above to test your DualSense drift first before you clean anything. The test shows the resting position for each stick. It also shows whether the offset stays steady or jumps around. A single flicker proves very little on its own. Write the number down before you move on. Without it, you cannot tell if cleaning or calibration helped at all.
Data Table 1: House drift verdict scale
How to read your number. Read your resting number against the house scale: flickers within 0.02 to 0.03 are normal noise, a steady offset from 0.05 to 0.10 is mild drift, and a steady offset above 0.10, or creeping in one direction, is clear drift. Random jumps while untouched point to debris, a loose stick, or a failing sensor. This scale is a tester convention used on this site for consistency. It is not a Sony, Microsoft, or Nintendo specification.
The full table, with the next step for each reading, sits in What Is Controller Stick Drift?, https://mygpadtester.com/what-is-controller-stick-drift/.
Some other testers use above 0.15 as their replace threshold. This site uses the scale above for consistency, and does not use 0.15 as its threshold. A steady offset matters more than a single flicker.
Read the scale with care. A steady offset matters more than one flicker. A flicker that returns to 0.00 is not the same as a stick that sits at 0.08 and stays there. Note which stick drifts, the direction, the connection, and the browser. Those facts turn a vague fault into a clear record. Keep the same test method for both readings. Change only one thing at a time between tests.
Is it really drift? Test before you fix.
A drift fault must show at rest, with no hand on the stick. Put the DualSense flat on a table. Leave both sticks untouched. Watch for 30 to 60 seconds. Read X and Y for each stick on its own. Record the stick, the direction, the value, the connection, and the browser. A stick that moves only when you push it is not drifting. A stick that moves on its own is the fault to chase. This short test stops many false fixes. It also stops you from cleaning a stick that was fine.
Separate rest drift from snapback with one simple check. Flick the stick and let it return on its own. Watch where it lands. A healthy stick returns close to center and stays there. A stick with snapback may overshoot or wobble, then settle. A stick with rest drift sits off center even when you never touch it. Those are different faults. They need different next steps. Do not mix them up. If you are unsure, repeat the flat test. Repeat it wired if you first tested wireless. A wired retest removes wireless jitter from the result. It gives a cleaner control reading.
If drift shows only in one game, pause before you touch the controller. Check that game first. Check its deadzone setting. Check its stick profile or preset. Check whether a custom profile is active. A game setting can mimic drift. A profile can shift center or change sensitivity. Fix the game setting first if only one game is affected. Test in a second game or in the browser test after that change. If the fault appears everywhere, the controller is the likely source. If it appears in one game only, the game setting is the likely source. That check saves time and avoids needless cleaning.
How the DualSense stick senses position
A standard DualSense stick measures position with a potentiometer, a track that can wear with use, while Hall effect and TMR sticks use magnets and do not wear a carbon track in the same way. A potentiometer is a variable resistor that forms a variable voltage divider (Tier 2, iFixit). Moving the stick moves a conductive wiper against a resistive contact pad, which varies the resistance and the output voltage. The controller reads that voltage as a position, with two potentiometers per stick, one for X and one for Y. Friction wears the resistive pads, so the neutral resistance changes and the controller reads movement while the stick is still (Tier 2, iFixit). That is why cleaning can help debris but cannot restore a worn track. The full explanation of stick drift, sensors, and wear sits in the Day 1 drift post. This guide does not claim that a DualSense model has Hall sticks unless that fact is verified. The full Hall versus potentiometer comparison explains the sensor difference. Keep the point simple for this fix: dirt can be cleared, wear cannot be cleaned away.
Fix in order, PS5 steps
Work in this order every time. Test first. Clean second. Calibrate third. Retest fourth. Use a deadzone bridge only for mild drift. Decide repair or replacement last.
If your drifting controller is an Xbox pad, not a DualSense, use the Xbox guide instead: Xbox Series X/S Stick Drift Fix, https://mygpadtester.com/xbox-series-stick-drift-fix/. The order is the same. Only the calibration step is different.
Warning before any cleaning or repair step: Check warranty before you clean around the stick base or change any setting that could affect a claim. Do not open the controller in this guide. Opening the controller can void warranty and can cause more damage. Stop at once for a swollen battery, heat, smell, or visible damage. Do not use the controller further in that case. Seek repair or replacement through a safe route. Keep the controller powered off while you clean. Let it dry fully before you test again.
PS5 DualSense Stick Drift Fix
Step 1: Test and record the before number.
Action: Put the DualSense flat and untouched. Follow the drift test procedure and test for 30 to 60 seconds. Record each stick, its direction, its value, its connection, and its browser. What you should see: A clear before number for the left stick and the right stick. A healthy stick reads 0.00, with only small flickers within 0.02 to 0.03. What failure means: No record means no proof later. If the reading jumps wildly, note that too. Wild jumps point to debris, a loose stick, or a failing sensor, not a small calibration fault.
Step 2: Power off, check warranty, then clean carefully.
Action: Power the controller off. Confirm warranty status before you proceed. Clean carefully around the stick base with short bursts of compressed air. Use contact cleaner only if it is safe for this use, and use only a small amount. Follow the product safety notes on the can. What you should see: Loose dust or debris clears from around the stick base. The stick still moves freely in all directions. No liquid pools around the module. What failure means: Drift that stays exactly the same after careful cleaning points to wear or a sensor fault, not dirt. A stick that feels gritty or loose after cleaning needs a decision, not more cleaning. Safety warning in this step: Do not flood the module. Do not use WD-40 or household cleaners. Stop at once for a swollen battery, heat, smell, or damage. Let the controller dry fully before you power it on or test it again.
Step 3: Use the PS5 built-in stick test and calibration.
Action: Check the PS5 platform controller settings for its built-in stick test and calibration. Run the test for each stick on its own, and watch where each stick sits at rest. Calibrate only the stick that drifts, and follow the on-screen calibration prompts for that stick. If the controller software is out of date, update it first: controller software updates come with PS5 console updates, or through the PlayStation Accessories app on a Windows PC (Tier 2, PlayStation Support). Then retest in the browser with the same flat, untouched method from Step 1. What you should see: The PS5 test shows the stick position at rest. After calibration, the rest reading sits closer to center in the browser retest. What failure means: A reading that does not move after calibration points to hardware wear or a sensor fault. Calibration can reset how center is read. It cannot restore a worn track. Do not repeat calibration again and again in hope of a different result. If one stick calibrates clean and the other does not, the fault sits in the stick that will not move, not in a shared setting. Use the platform controller settings above and follow the on-screen prompts for that stick.
Step 4: Retest with the same method and record the after number.
Action: Use the same flat, untouched method as Step 1. Test for 30 to 60 seconds. Record each stick, its direction, its value, its connection, and its browser. Use a wired test as the control if the first test was wireless. What you should see: The after number is lower than the before number, or the stick now holds center. A mild reading that drops back into normal noise is a good result. What failure means: An after number that matches the before number means cleaning and calibration did not fix the fault. A number that falls, then climbs back within days, also points to wear. Record both numbers. They drive the final decision.
Step 5: If mild drift remains, use the smallest stable deadzone as a bridge.
Action: Set the smallest deadzone that keeps the stick at rest in normal play. Test each stick on its own. Raise the value only in small steps. Stop at the first stable value. What you should see: The character or camera no longer moves when you leave the stick alone. Fine aim still feels usable. The stick still responds to small, deliberate moves. What failure means: A large deadzone that kills fine aim is a poor trade. A deadzone that must keep growing shows the drift is getting worse. A deadzone hides drift. It reduces fine aim precision. It does not repair hardware. Treat it as a bridge, not a fix.
Step 6: Decide repair or replace.
Action: Compare the before number with the after number. Check warranty first. Check whether both sticks drift. Check whether other parts also fail, such as buttons, triggers, or wireless connection. What you should see: A clear choice based on facts, not hope. Warranty cover points to an official repair route. Mild, stable drift points to monitoring. Clear, steady drift after clean and calibrate points to repair or replacement. What failure means: A decision made without numbers often wastes money. A repair that costs close to a new controller may not be worth it. A second fault, such as a failing trigger or button, can tip the choice toward replacement.
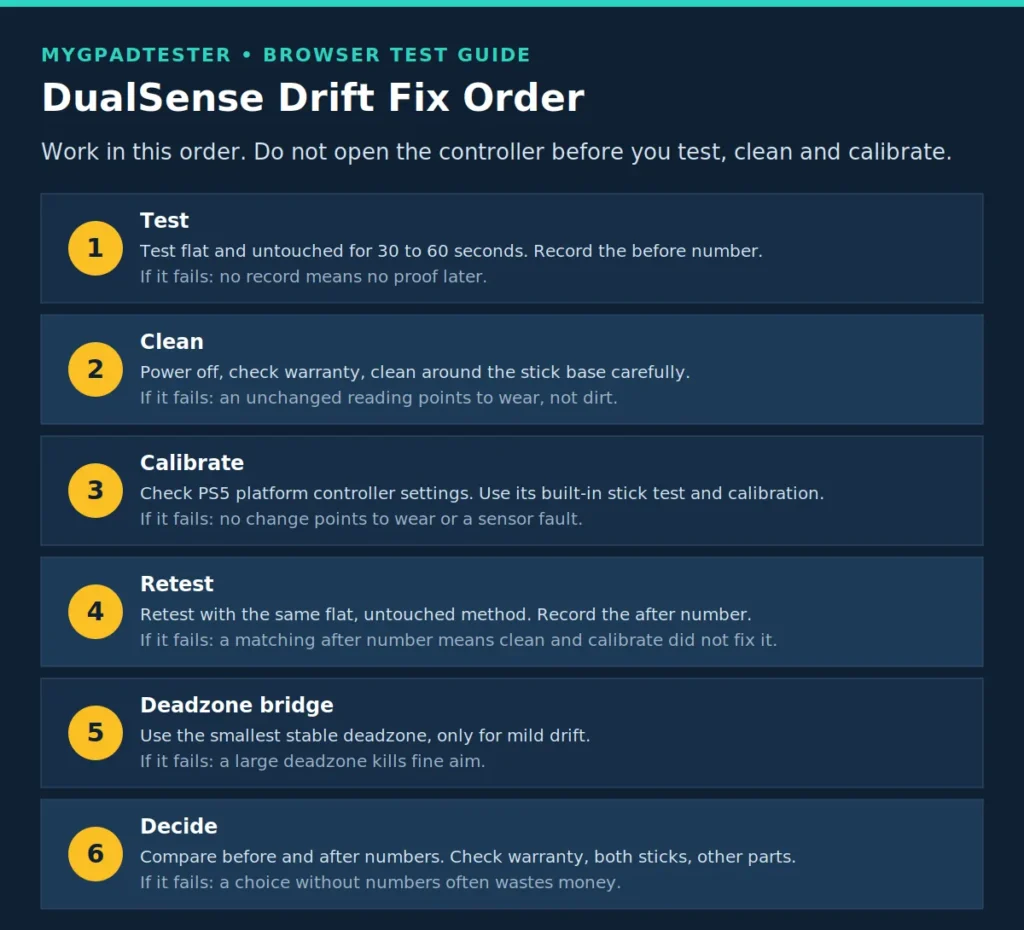
The six steps above are the full order: test, clean, calibrate, retest, deadzone bridge, decide. The detail for each step sits in the step itself, so this guide does not repeat it in a second table.
Troubleshooting
| Problem | Fix, then retest |
|---|---|
| Drift only in one game | check that game deadzone and profile first, then test in a second game. Do not open anything. |
| Drift disappears wired but appears on Bluetooth | judge the fault on the wired number. Wireless jitter can make a borderline reading look worse, and Bluetooth does not create potentiometer wear. |
| Drift returns after cleaning | treat it as wear, not dirt. Clean once more only if debris is still likely, then move to the repair versus replace decision. |
| One stick only | test each stick on its own, clean only the affected stick base, calibrate, then retest that stick. |
| Controller not detected | press a button, refresh, try another port or cable, use Chrome or Edge, close remappers for the clean test, then re-enable afterwards if used. |
Close Steam Input, DS4Windows, or a similar remapper for the clean test. A remapper can mask drift or create a false reading. Close it, test clean, record the number, then re-enable afterwards if you use it. Keep the clean test as the control number.
Limitations Box
This browser test reads Gamepad API timestamps and reported axis values. It is not a lab measurement. Stick axes run from minus 1.0 to 1.0 (Tier 1, W3C Gamepad API). Tester numbers are evidence, not a repair certificate. Repeat the test. Confirm the fault a second way, such as wired versus wireless, or a second game. Check warranty before opening the controller. This guide never recommends opening the controller. A test never fixes drift on its own. A test only shows what the stick reports at rest.
Related Tools
All 8 tools are listed below. Stick Drift Test is highlighted as the pillar tool for this guide.
- Gamepad Health Checker: Gamepad Health Checker
- Button Test: Button Test
- Input Lag Test: Input Lag Test
- Stick Drift Test (highlighted pillar): Stick Drift Test
- Trigger Test: Trigger Test
- Vibration Test: Vibration Test
- Stick Deadzone Test: Stick Deadzone Test
- Polling Rate Test: Polling Rate Test
Related Guides
- Stick Drift Test (pillar tool)
- Gamepad Health Checker (testing tool, same tools family)
- What Is Controller Stick Drift? (Day 1 drift foundation post, live since 27 Oct 2026)
- Stick Deadzone Test for the deadzone bridge in Step 5.
- Xbox Series X/S Stick Drift Fix, https://mygpadtester.com/xbox-series-stick-drift-fix/ (same fix order, Xbox calibration instead of PS5 calibration).
About the Author
Marcus Sterling, Lead Engineer and Founder, Austin, Texas, USA.
Certified Hardware Analyst with over 12 years hands-on experience in gaming peripheral diagnostics.
Associate Member of IEEE (Consumer Electronics Society); Specialization Advanced TMR Magnetic Sensor Calibration and Latency Testing; Former Lead Tech at Performance Labs TX in Austin; Certifications ESD Professional and Master Hardware Diagnostic Certified, plus iFixit Master Tech.
Methodology note: A tester number is evidence, not a repair certificate. Repeat it, confirm it a second way, and check warranty before opening the controller.
Links in author box only:
- Author Profile: Marcus Sterling
- About: About
- Testing Methodology: Testing Methodology
- Contact: Contact
- X: X
Frequently Asked Questions
How do I fix DualSense stick drift?
Test the DualSense flat and untouched for 30 to 60 seconds first, then clean, calibrate, and retest in that order. Record a before number and an after number for each stick. If the reading stays steady above 0.10 after clean and calibrate, move to a repair versus replace decision. Do not open the controller in this guide.
Can calibration fix DualSense drift?
Calibration can fix a reading fault, but it cannot restore a worn potentiometer track. Use the PS5 platform controller settings for its built-in stick test and calibration. Retest with the same flat method after calibration. If the after number matches the before number, the fault is likely wear or a sensor fault, not calibration.
Does cleaning fix DualSense drift?
Cleaning can fix drift caused by debris around the stick base. Power off first, check warranty, then clean carefully with compressed air and, only if safe, a small amount of contact cleaner. Do not flood the module. Do not use WD-40 or household cleaners. Cleaning cannot restore a worn track.
Why does my DualSense drift return after cleaning?
Drift that returns after cleaning usually points to wear, not dirt. A worn track does not heal when debris is cleared. A number that falls after cleaning, then climbs back, is a strong sign of wear. Record the before and after numbers. Use them to decide repair or replacement.
Should I use deadzone for DualSense drift?
Use deadzone only as a bridge for mild, steady drift from 0.05 to 0.10. Set the smallest stable value that stops movement at rest. A deadzone hides drift, reduces fine aim precision, and does not repair hardware. A deadzone that must keep growing shows the drift is getting worse.
Should I repair or replace my DualSense?
Decide from warranty, before and after numbers, and whether both sticks or other parts also fail. Warranty cover points to an official repair route. Mild, stable drift points to monitoring and retest. Clear, steady drift after clean and calibrate points to repair or replacement.
Does the DualSense Edge fix drift by itself?
No, the DualSense Edge does not fix drift by itself. An Edge module swap is a separate later post, named in text only here. This guide does not present a verified step by step Edge swap guide. Test, clean, calibrate, and retest first, even if you own an Edge. Decide repair or replacement from the numbers, not from the model name alone.
Why does my DualSense drift only in one game?
Because a game setting can mimic drift. Check that game deadzone setting, stick profile or preset, and whether a custom profile is active. Fix the game setting first, then test in a second game or in the browser test. If the fault appears everywhere, the controller is the likely source. If it appears in one game only, the game setting is the likely source.
Next Steps
If drift is mild and stable, monitor it and retest on a regular basis. Record each new reading next to the old one. Watch for a number that creeps higher over time.
If drift is clear after clean and calibrate, read the repair versus replace post when it is published. That post is named in text only here, and is not linked yet. Use your before and after numbers to judge the choice.
If other faults appear, such as failing buttons or triggers, use the Gamepad Health Checker.
No affiliate links anywhere in this guide.