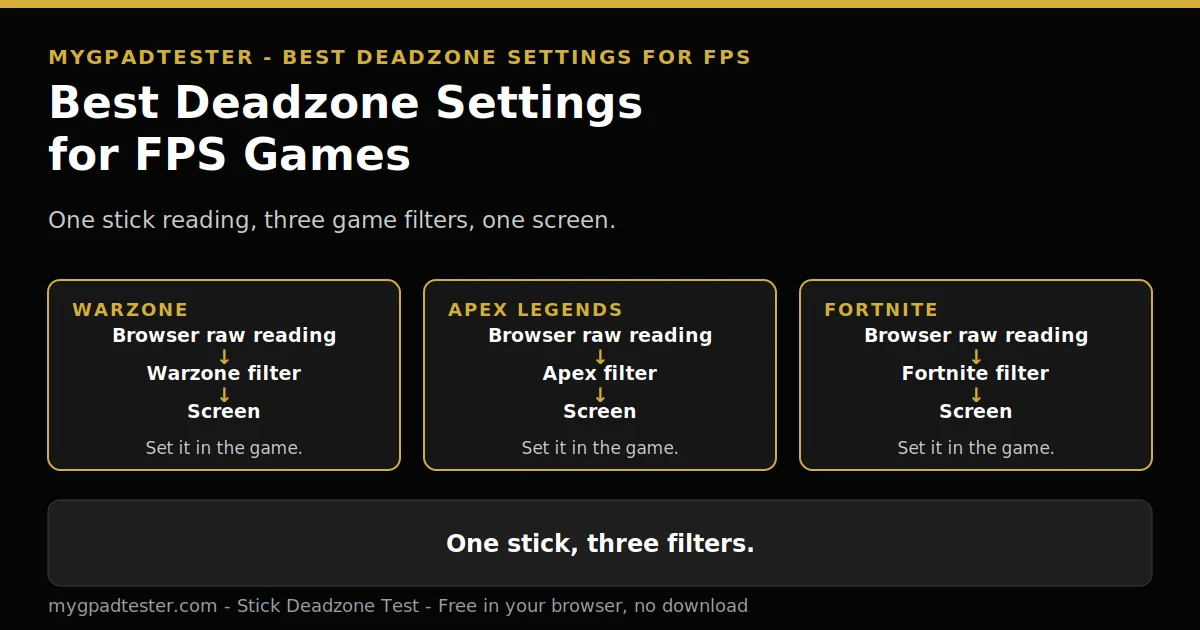
Your aim feels sluggish, and your character drifts on its own in Warzone. Every guide gives a different number to copy, and none of them explains why the same number feels different in Apex. This post starts from your own stick, not from a copied number, and sets Warzone, Apex, and Fortnite separately.
Last updated: 20 November 2026 | Category: Performance Optimization | Reading time: about 16 minutes | Tested with Chrome/Edge, Gamepad API
Quick Answer
There is no single best deadzone for FPS games. The right value comes from your own stick, not from a copied number. Test the stick at rest in the browser, start from the resting reading plus 0.01, and set Warzone, Apex, and Fortnite separately, because each game filters the stick its own way.
No download. No account. Data stays in your browser.
The browser test reads the raw stick value before any game filter. That raw reading is the starting point for every setting in this post. No number here is a best setting. Every starting point is labelled a community pattern or a tester guide, and each one comes with the measure-first test.
What is the best deadzone setting for FPS games?
There is no single best deadzone for FPS games, because the right value depends on your stick, not on the game. A new stick with a quiet rest reading runs a low deadzone, while a worn stick needs a higher one. Measure your own stick first, then start from its resting reading plus 0.01.
Test the stick at rest in the browser tester first. The browser reads the raw axis value, between minus 1.0 and plus 1.0, before any game applies its own deadzone on top. The game sees a filtered value, so the browser value and the in-game value are not the same number. The deadzone definition, with the three deadzone types and the platform table, lives in What Is Controller Deadzone? This post stays with settings.
A resting stick that sits inside plus or minus 0.02 to 0.03 is normal resting noise, a house tester convention, not a Sony, Microsoft, or Nintendo specification. That stick can run a low deadzone. A steady offset of 0.05 to 0.10 in one direction is measurable mild drift. The table below turns the resting reading into a starting deadzone to try. No number in it is a vendor specification.
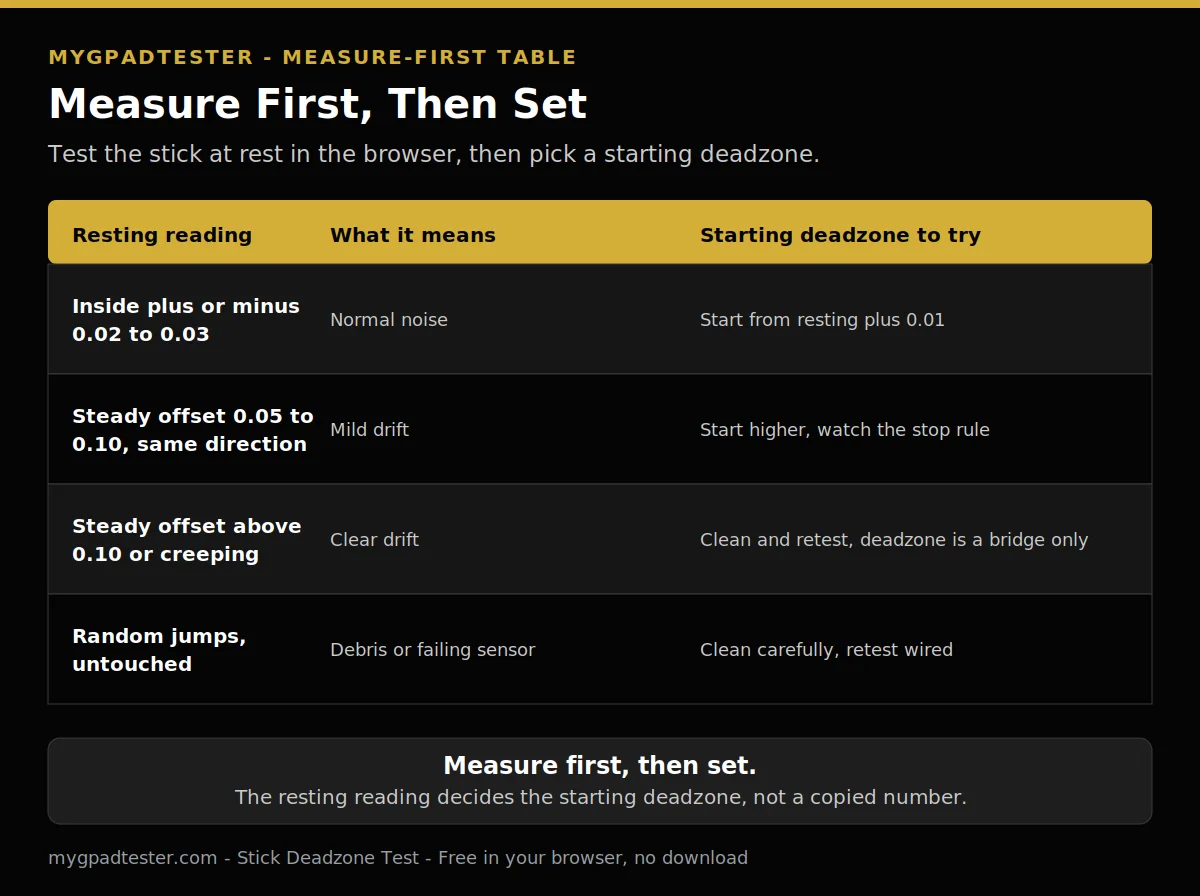
| Resting reading | What it means | Starting deadzone to try |
|---|---|---|
| Inside plus or minus 0.02 to 0.03 | Normal noise | Start from resting plus 0.01 |
| Steady offset 0.05 to 0.10, same direction | Mild drift | Start higher, watch the stop rule |
| Steady offset above 0.10 or creeping | Clear drift | Clean and retest, deadzone is a bridge only |
| Random jumps, untouched | Debris or failing sensor | Clean carefully, retest wired |
Community patterns give a rough range only. Competitive FPS patterns run 3 to 5 percent or 4 to 8 percent, casual patterns 8 to 12 percent. Treat those as patterns, never as vendor facts, and always attach the measure-first test above. The lowest value that keeps a resting stick quiet is the target, not zero.
What deadzone should I use in Warzone?
Use the Warzone controller setting as your starting point, and set it from your own measured resting reading, not from a copied number. Start low, from resting plus 0.01, then test in a real match, because Warzone filters the stick its own way and a menu number alone cannot tell you how it feels.
Open the game controller options and find the deadzone setting there. This post names no exact menu path, because menu labels change between game updates. Look for the controller section in the game settings, not for a fixed label from an old guide.
The community pattern for Warzone is 0 to 5, labelled a pattern only, never a vendor fact. Start from your own resting reading plus 0.01, inside that range where your stick allows it. Then test in a real match, because a menu number alone cannot tell you how the setting feels under fire. The full per-game table, with all three games side by side, sits in the Fortnite section below.
What deadzone should I use in Apex Legends?
Use the Apex controller setting as your starting point, and set it from your own measured resting reading, not from a copied number. Apex offers Linear and other response curves alongside deadzone, so settle the deadzone first, then judge the curve, and test in a real match before changing anything else.
Apex filters the stick its own way, so the Warzone value does not carry over. Open the game controller options, find the deadzone setting, and start from your own resting reading plus 0.01. The community pattern for Apex is 0 to 3, labelled a pattern only.
Linear is a response curve, not a deadzone value. A curve changes how stick movement ramps up after input starts. Settle the deadzone first, then judge the curve on its own, and change only one of them per test. This post does not build a response-curve guide.
What deadzone should I use in Fortnite?
Use the Fortnite controller setting as your starting point, and set the left and right sticks separately, because building and aiming ask for different precision. Start from each stick’s own resting reading plus 0.01, then test in a real match, and change one stick at a time.
Building asks for fast, full-stick movement. Aiming asks for small, precise corrections. The two jobs want different values, so set each stick from its own resting reading and test them separately. The community pattern for Fortnite is 0 to 10, labelled a pattern only, and the right stick usually sits at the lower end of the same range.
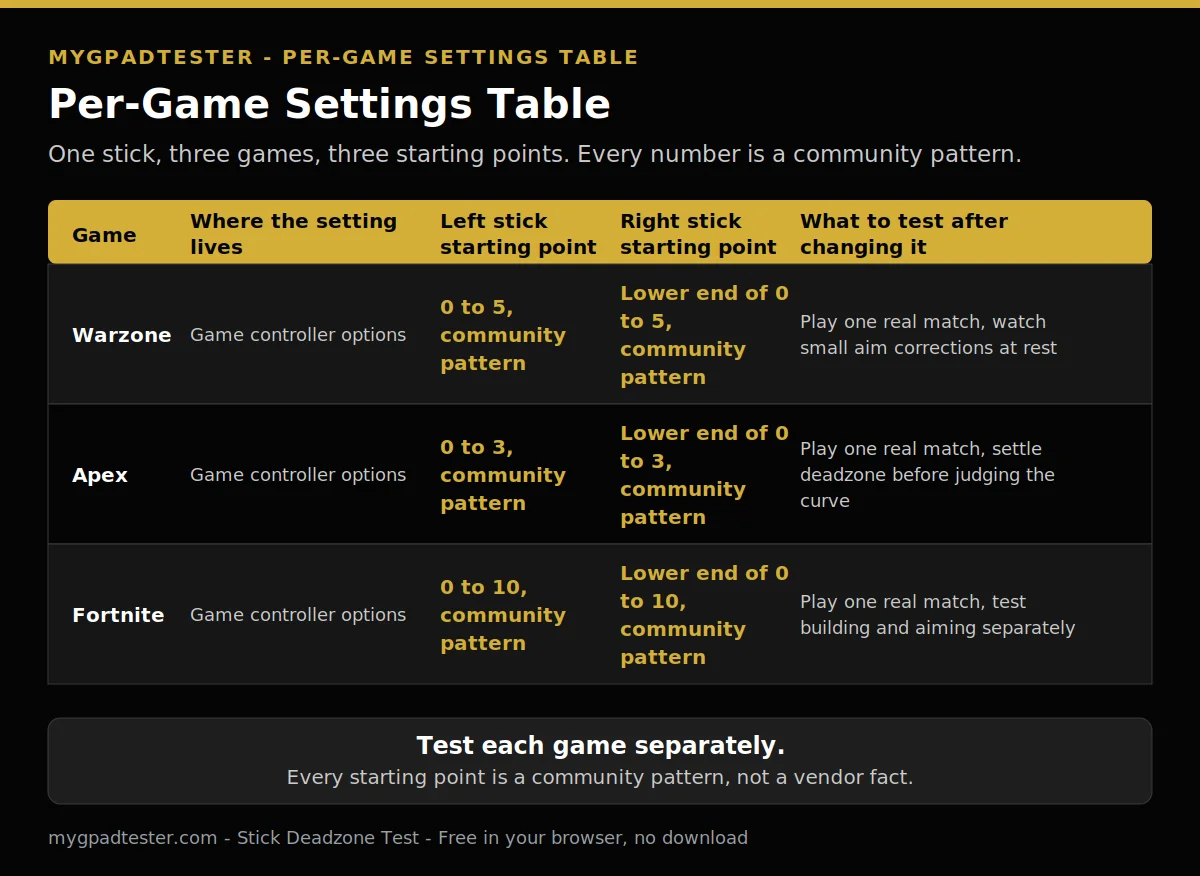
| Game | Where the setting lives | Left stick starting point | Right stick starting point | What to test after changing it |
|---|---|---|---|---|
| Warzone | Game controller options | 0 to 5, community pattern | Lower end of 0 to 5, community pattern | Play one real match, watch small aim corrections at rest |
| Apex | Game controller options | 0 to 3, community pattern | Lower end of 0 to 3, community pattern | Play one real match, settle deadzone before judging the curve |
| Fortnite | Game controller options | 0 to 10, community pattern | Lower end of 0 to 10, community pattern | Play one real match, test building and aiming separately |
Should the left stick and right stick have the same deadzone?
No, the left and right sticks should not share one deadzone value, because each stick has its own resting reading and its own job. The aim stick usually runs lower than the move stick, since small aim corrections matter more, but the value still comes from each stick’s own measurement, never from copying the other stick.
The left stick moves the character. The right stick aims. A worn left stick does not justify raising the right stick, and a quiet right stick does not justify lowering the left one. Set each stick from its own resting reading, and record each reading before changing anything.
No fixed left versus right split number is claimed in this post. The aim stick usually sits at the lower end of the same range, but the value comes from its own measurement. If the two sticks end up far apart, that is normal: the sticks wear differently, and the readings say so.
My aim drifts when I am not touching the stick. Is that a deadzone problem or stick drift?
A stick that moves on its own is drift, and a deadzone only hides it, it does not repair it. Test the stick at rest in the browser tester first: a steady offset in one direction means drift, while a flicker inside plus or minus 0.02 to 0.03 is normal resting noise.
A steady offset of 0.05 to 0.10 in the same direction is mild drift. A bigger deadzone stops the visible movement, but it costs fine aim precision, and the wear is still there. A lower deadzone never fixes a worn stick. It lets the drift through sooner.
Hall effect sticks have smaller dead zones when centered, which makes them more responsive to small movements, and they can register more subtle stick movements than potentiometers. That is a Tier 2 iFixit fact, kept qualitative, with no invented percentage. A Hall stick still wears in other ways, and a worn stick of either type needs a higher deadzone and a repair decision, not a lower one.
Above about 0.20, stop tuning and decide on cleaning, calibration, or repair. That stop rule is a tester guide, never a vendor specification. The repair-versus-replace decision lives in Signs Your Controller Is Failing or Dying, linked in Related Guides below. The browser drift test lives in How to Test Stick Drift Online, linked in Related Guides below.
Why does the same deadzone feel different in Warzone, Apex and Fortnite?
The same deadzone feels different in each game because each game applies its own deadzone on top of the raw stick reading, and the browser reads the raw value before any game filter. A setting that feels right in Warzone can feel loose or slow in Apex, so test the same stick separately in each game.
The browser shows the raw value. The game shows the filtered value. The filter is the game’s own deadzone, applied on top of the raw reading, and each game filters the stick its own way. No built-in figure for any of the three games is claimed in this post, because no vendor page states one.
How often the controller reports a new reading is its polling rate. The polling rate ladder explains the tiers. The report interval is maths, 1000 divided by Hz, never a guaranteed end-to-end latency. Test the same stick separately in each game, and keep one setting per game.
Should I change the deadzone in the game, in Steam Input, or both?
Change the deadzone in the game first, and use Steam Input only when the game setting cannot reach the problem. Never set both at once, because two deadzone layers stack and hide which change helped. Test one layer, record the result, and only then touch the other layer.
Steam Input is a translation layer between the controller and the game. Its Deadzone setting runs 0.0 to 1.0, the radius of the central region to ignore, per Valve Steamworks Documentation, Tier 1 and 2. Use it only when a game has a deadzone you cannot reach through the game setting itself.
Anti-deadzone subtracts away the game’s own deadzone and gives finer control within the remaining range. The higher the slider, the more is added to the smallest output value. If all deadzone is removed entirely, all positions will cause input, so the Anti-Deadzone Buffer acts as the new deadzone. Never stack anti-deadzone on top of drift, and never use it as a first step when the game setting itself can do the job. A full Steam deadzone settings post is planned as a spillover post.
How do I set deadzone step by step, one stick at a time?
Set deadzone in this order: test the stick at rest in the browser, record the resting reading for each stick, set the left stick from resting plus 0.01, set the right stick the same way, then play one game and retest. If the aim feels worse, restore the measured resting value and start again.
About 30 minutes for the full check sequence, including one match. If the match runs long, allow extra time.
- Browser test at rest. Test the stick at rest in the browser tester, hands off, and watch the reading for a few seconds.
- Record the resting reading. Write down the resting reading for each stick, left and right separately.
- Set the left stick. Set the left stick from its resting reading plus 0.01, in the game controller options.
- Set the right stick. Set the right stick the same way, from its own resting reading plus 0.01.
- Play one game. Play one full game and watch small aim corrections at rest.
- Retest. Test the stick at rest in the browser again, and compare the reading with the first test.
- Restore if worse. If the aim feels worse, restore the measured resting value and start again. Change sensitivity or curve only after the deadzone is settled.
How do I set deadzone step by step, one stick at a time?
Total Time: 30 minutes
Browser test at rest.
Test the stick at rest in the browser tester, hands off, and watch the reading for a few seconds.
Record the resting reading.
Write down the resting reading for each stick, left and right separately.
Set the left stick.
Set the left stick from its resting reading plus 0.01, in the game controller options.
Set the right stick.
Set the right stick the same way, from its own resting reading plus 0.01.
Play one game.
Play one full game and watch small aim corrections at rest.
Retest.
Test the stick at rest in the browser again, and compare the reading with the first test.
Restore if worse.
If the aim feels worse, restore the measured resting value and start again. Change sensitivity or curve only after the deadzone is settled.
Retest on the connection you play on. The connection changes latency, not the deadzone. The USB versus Bluetooth polling comparison explains the connection side. No fix in this post promises a millisecond saving. Each step isolates one change, and the step that clears the problem names the cause.
Related Tools
- Stick Deadzone Test (pillar, highlighted)
- Polling Rate Test
- Button Test
- Trigger Test
- Vibration Test
- Stick Drift Test
- Input Lag Test
- Gamepad Health Checker
Related Guides
- How to Test and Visualize Your Controller Deadzone
- How to Test Stick Drift Online
- Signs Your Controller Is Failing or Dying
About the Author
Marcus Sterling, Lead Engineer and Founder of MyGpadTester, Austin, Texas. Profile: https://mygpadtester.com/marcus-sterling/ X: https://x.com/marcussterlin
There is no single best deadzone for FPS games. Measure your own stick, set each game separately, and keep the value that holds the stick quiet at rest.
Frequently Asked Questions
Is a lower deadzone always better for FPS?
No. A lower deadzone is better only when the stick rests quietly. If the stick flickers or drifts at rest, a very low deadzone lets that movement through, so the aim drifts. The target is the lowest value that keeps a resting stick quiet, not zero.
Do pro players use 0 deadzone?
Do not copy a pro number. The right value comes from your own stick’s resting reading, and a pro plays on different hardware with a different stick. Measure your own stick and start from resting plus 0.01. No pro statistic is quoted in this post.
Does deadzone affect aim assist?
Deadzone and aim assist are separate systems. Deadzone filters the stick input before the game reads it; aim assist acts on the aim after the input. A deadzone change does not change an aim assist strength. No aim assist number is quoted in this post.
Can I copy a pro player’s deadzone settings?
No, not as a starting point for your stick. A pro setting is a community pattern at best, and it was tuned for a different stick. Use the measure-first test in this post, then set the value your own stick needs.
What if my stick still drifts at 0.20 deadzone?
Stop raising the deadzone. Above about 0.20, the value hides the problem and costs fine aim, so clean the stick, test again, and decide on repair or replacement. The failing-signs post is linked in Related Guides.
Does deadzone change between wired and wireless?
No. Deadzone is a software filter on the stick reading, so the same value applies wired or wireless. The connection changes latency, not the deadzone. Test the resting reading on the connection you play on.
There is no best deadzone number to copy. The right value comes from your own stick, measured at rest, set per game and per stick, and tested in a real match. A low deadzone on a quiet stick keeps small aim corrections alive. A higher deadzone on a worn stick buys time, not a repair. Run the browser test again any time on MyGpadTester.
Next Steps
Test the stick again with the Stick Deadzone Test, then work the steps in order. Read How to Reduce Controller Input Lag on PC for the PC lag fix order. Read Xbox Deadzone Settings for the Xbox platform route. Read PS5 Deadzone Settings for the PS5 platform route.