
Your character or camera moves even when you do not touch the stick, so test for stick drift online free in 60 seconds, with no download, and get a number, not a guess.
Last updated: 14 November 2026 | Category: Controller Testing Tools | Reading time: about 13 minutes | Tested with Chrome/Edge, Gamepad API
Quick Answer
Put the controller flat, leave both sticks untouched for 30-60 seconds, and read X and Y at rest in the drift test. Near 0.00 is healthy. A steady offset at 0.05 or higher in the same direction is drift. A random flicker that disappears is noise, not drift: repeat the test before you decide.
Test your stick drift free: Stick Drift Test No download. No account. Data stays in your browser.
House verdict scale: use this scale for every reading
Use this scale for every reading. It matches the foundation drift guide. These are typical tester values, Tier 3 (typical / community-tested), not a Sony, Microsoft, or Nintendo specification.
| Rest reading | Verdict | What to do |
|---|---|---|
| 0.0000, flickers within ±0.02-0.03 | Normal sensor noise, not drift | No fix needed; retest only if symptoms return |
| Consistent offset ±0.05-0.10, same direction | Measurable mild drift | Clean/calibrate check, smallest stable deadzone as a bridge, retest, monitor |
| Consistent offset above ±0.10, or creeping in one direction | Clear drift | Clean/calibrate, then repair vs replace decision (full guide later, not here) |
| Random jumps, even untouched | Debris / loose stick / failing sensor | Clean carefully, retest wired, then repair vs replace decision |
A steady offset matters more than a single flicker. One glance is not evidence: repeat the test.
Some other testers use above 0.15 as their replace threshold; this site uses the scale above for consistency.
Before you test: 5 mistakes that fake a drift result
- Holding the controller in your hands: hand movement moves the stick, so put the controller flat and keep your hands off.
- Testing on a soft or tilted surface: use a flat, stable, non-magnetic surface.
- Testing only in a game: a game applies its own deadzone, sensitivity, response curve, can hide mild drift or make normal noise look like drift. Test in the tester first, then confirm in a game.
- Testing once, for two seconds: sensor noise flickers. This test uses 30-60 seconds untouched.
- Testing only one stick: left and right sticks fail independently. Test both and record both.
Also close remappers that can grab the pad for the clean test: Steam Input and DS4Windows are the common ones. Re-enable afterwards if used.
Check warranty before opening anything. This guide does not recommend opening the controller. If later considering cleaning inside the stick housing or any repair, check warranty terms first, claim it first if it applies. Opening can void it.
How to read the result: left vs right, X vs Y, steady vs creeping
The browser drift test reads stick positions through the Gamepad API. Each stick reports X (left-right) and Y (up-down). Axes are normalised from -1.0 to 1.0, with 0.0000 at centre under the standard mapping. The tester shows the reported axis value, not the physical track. Calibration error can look like drift until retested. A potentiometer stick reads position from a wiper moving against a resistive pad, and wear changes the resting resistance so the controller reads movement at rest (Tier 2, iFixit authority explainer).
Do not average the two sticks. A left-stick offset of 0.08 and right-stick 0.00 is a left-stick problem. Direction matters. A steady offset in the same direction on repeat is classic drift. A value growing over 60 seconds is stronger evidence. Random jumps, changing direction, or disappearing on retest is not a drift verdict yet.
A dot inside the deadzone circle is not automatically a pass. Deadzone is the centre area a game ignores. If the dot sits inside that circle in the tester but the character still moves in-game, the problem may be a game deadzone or response-curve setting, not tester drift. Confirm in a second game and a second tester.
Circularity is a different check from this rest test. It is not measured here, and it is not needed to answer: do I have drift at rest?
Confirm it a second way
Confirm a browser result with a second check before deciding. Platform built-in checks: PS5 Test Input Devices or Calibrate Controller Sticks; Xbox Accessories stick test; Switch Calibrate Control Sticks; Steam Test Device Inputs or calibration; Windows Game Controller Settings as a secondary PC check only.
Authority references by name only: Sony PlayStation Support, Microsoft Xbox Support, Nintendo Support. The W3C Gamepad API specification is the authority for how the browser reads axes. No exact support-page URL is linked here, because a guessed support URL would be worse than no link.
If the second check agrees, drift is confirmed. If it disagrees, retest wired, same surface, same browser, and check for a game-specific deadzone setting before opening anything.
How to test for stick drift: the 60-second method
How to Test Stick Drift Online Free (PS5, Xbox, Switch): 60-Second Test
Total Time: 1 minute
Put the controller flat, hands off, on a flat, stable, non-magnetic surface, with hands completely off.
Any value now is hand movement, not drift. Start again.
Open the test and wake the controller: Stick Drift Test in Chrome or Edge.
Press any button. Browsers keep the Gamepad API dormant until input. Both sticks should be shown at rest. If not, refresh, try another port or cable, use Chrome or Edge, and close remappers grabbing the pad. Do not judge drift from a controller the tester cannot see.
Leave both sticks untouched for 30-60 seconds.
Watch X and Y per stick separately. Healthy values are near 0.00 with only tiny flickers within ±0.02-0.03. A steady offset at ±0.05 or higher in the same direction is the drift signal. A random jump that disappears is noise, not a verdict.
Note your before number: left vs right, direction, and value, to compare after cleaning, calibration, or a deadzone change.
Without a before number you cannot tell later whether a fix helped.
Move both sticks through full range once, then re-read at rest.
Push each stick through full range, let it snap back, leave it untouched again and re-read. The rest value should return to the same range as Step 3. Overshoot and oscillation on return is snapback, a return-to-centre problem, not just rest drift. Test at rest for drift, flick-and-return for snapback, and fix the worse one first.
Repeat after a restart, or wired if the first result was borderline.
The same direction and similar value indicates real drift. A value changing direction or disappearing on retest is noise, connection variation, or a game setting, not a reason to open the controller.
Record the full result: stick, direction, value, connection (wired or Bluetooth), and browser.
This is usable for a warranty claim, repair decision, or later retest. A bare ‘it drifts’ with no number, stick, or connection will not help support, a repair shop, or your future self.
Troubleshooting: what your result actually means
Never declare a controller ‘broken’ from one number. Change one variable, retest, and only then decide.
| Symptom | Likely cause | What to do |
|---|---|---|
| Drift only in one game | Game deadzone, sensitivity, or profile setting | Check that game’s settings, then retest in the tester and in a second game |
| Drift disappears wired but appears on Bluetooth | Wireless jitter can make a borderline reading look worse; Bluetooth does not create potentiometer wear, wired is the control | Retest wired as the control; judge the stick from wired, wireless quality separately |
| Drift after cleaning | Cleaning helps debris, not a worn track; if drift returns, it is wear, not dirt | Clean carefully (safety note below), retest wired, then repair vs replace decision |
| One stick only | That stick’s axis or sensor | Test that stick’s axis separately; do not replace the whole controller on one reading |
| Controller not detected | Gamepad API dormant, port/cable, browser, or remapper grabbing the pad | Press a button, refresh, try another port/cable, use Chrome/Edge, close remappers |
| Value jumps randomly, even untouched | Debris, loose stick, or failing sensor | Clean carefully, retest wired, then repair vs replace decision |
Safety note for cleaning, read before any cleaning step: Check warranty first. Power off and disconnect before cleaning around the stick base. Use compressed air. Use only a small amount of electronics contact cleaner if comfortable using it. Do not flood the module. Do not use WD-40 or household cleaners. Stop immediately if the battery is swollen, hot, or damaged. Do not open the controller in this how-to. Cleaning here means external, careful cleaning only.
If other faults show up alongside drift, check the nine failing signs to see the whole pattern.
Limitations Box: What this test cannot tell you
A tester number is evidence, not a repair certificate. Repeat it, confirm it a second way, and check warranty before opening the controller. This browser test measures reported Gamepad API axis values at rest. It does not measure the physical potentiometer track. It does not certify that a stick is worn. And it does not repair anything. Rest values here are tester conventions, not a Sony, Microsoft, or Nintendo specification. A single run, in a single browser, in a single game, is not enough to decide. It cannot settle repair or replacement alone.
Visuals
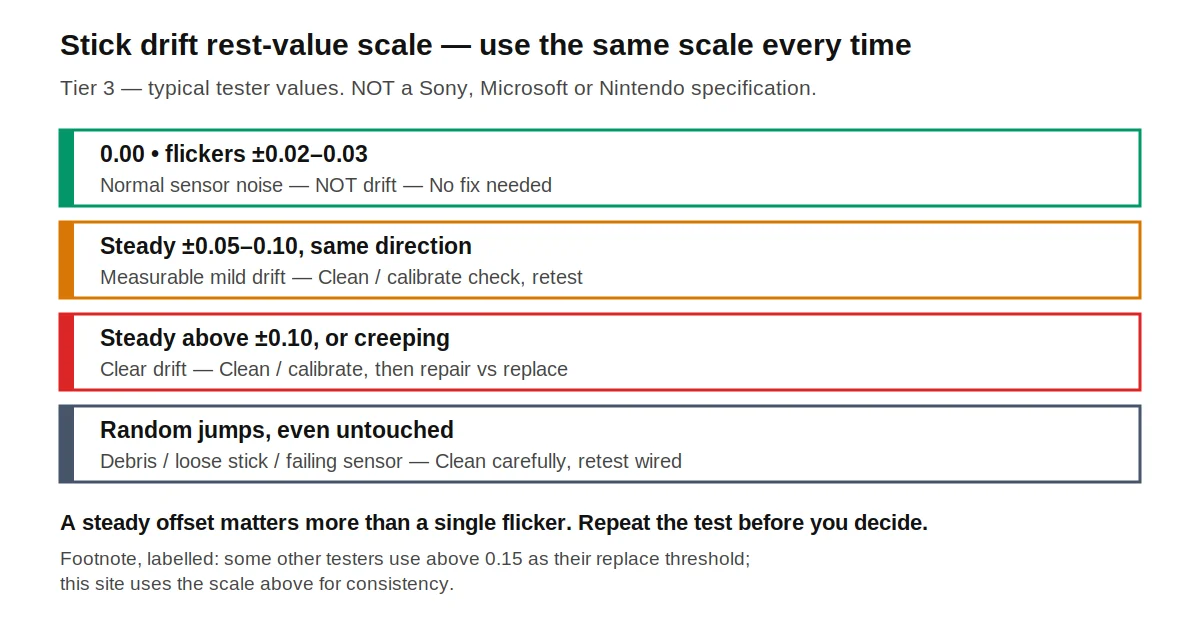
| Rest reading | Verdict | What to do |
|---|---|---|
| 0.0000, flickers within ±0.02-0.03 | Normal sensor noise, not drift | No fix needed; retest only if symptoms return |
| Consistent offset ±0.05-0.10, same direction | Measurable mild drift | Clean/calibrate check, smallest stable deadzone as a bridge, retest, monitor |
| Consistent offset above ±0.10, or creeping in one direction | Clear drift | Clean/calibrate, then repair vs replace decision (full guide later, not here) |
| Random jumps, even untouched | Debris / loose stick / failing sensor | Clean carefully, retest wired, then repair vs replace decision |
Some other testers use above 0.15 as their replace threshold; this site uses the scale above for consistency.

| Problem | Where it shows | Test for it |
|---|---|---|
| Stick drift | At rest, untouched | Flat, untouched 30-60 seconds, read X/Y |
| Deadzone | Centre area ignored by the game | Smallest stable deadzone that hides mild drift, then confirm in game |
| Snapback | After a flick, on return to centre | Flick and release, watch for overshoot/oscillation, not rest offset |
Related Tools
This post supports: Stick Drift Test
- Gamepad Health Check
- Button Test
- Input Lag Test
- Stick Drift Test
- Trigger Test
- Vibration Test
- Stick Deadzone Test
- Polling Rate Test
More in this category
Pillar tool: the drift test. If drift is mild, find the smallest stable deadzone: Deadzone Test. Troubleshooting link only: if the stick passes drift but feels slow, check Hz and lag separately, do not blame drift: Polling Rate Test. Full check after a drift result: Gamepad Health Checker.
All Controller Testing Tools articles
Same category, confirmed live: What Is Controller Stick Drift? Causes, Symptoms, and How to Test It Properly. No link is included to any Day 3 post or any future slug.
About the author
Marcus Sterling, Lead Engineer & Founder, MyGpadTester, Austin, Texas, USA
Marcus Sterling is a Certified Hardware Analyst with over 12 years of hands-on experience in gaming peripheral diagnostics. He is professionally certified by iFixit as a Master Tech, and has spent years analyzing Hall Effect sensors to solve the industry’s stick drift crisis. He built MyGpadTester to give every gamer the same pro-level diagnostic tools he uses on his own workbench.
Affiliations: Associate Member of IEEE (Consumer Electronics Society). Specialization: Advanced TMR Magnetic Sensor Calibration & Latency Testing. Former: Lead Tech at Performance Labs TX in Austin. Certifications: ESD Professional & Master Hardware Diagnostic Certified
Tests follow the MyGpadTester methodology: same browser, same connection, wired first, retest before deciding. Results are browser estimates via the W3C Gamepad API, not lab measurements.
Follow Marcus Sterling on X (Twitter): https://x.com/marcussterlin
About: https://mygpadtester.com/about/ | How We Test: https://mygpadtester.com/about/testing-methodology/ | Contact: https://mygpadtester.com/contact/
Last updated: 14 November 2026. How we checked this guide: steps are written so a reader can repeat them with a browser test, not a lab. Values are typical tester values, not a manufacturer specification.
Frequently asked questions
How do I test for stick drift online? Flat surface, hands off, drift test, 30-60 seconds untouched, read X/Y per stick, repeat.
What resting value counts as drift? Near 0.00 with flickers within ±0.02-0.03 is noise; a steady offset at ±0.05 or higher in the same direction is drift on this site’s scale.
Is a small amount of movement normal? Yes, tiny random flickers within ±0.02-0.03 are normal sensor noise; a consistent offset is not.
Can a stick drift test fix my controller? No, it diagnoses and measures drift. Fixing needs cleaning, recalibration, deadzone as a bridge, or module replacement, each in its own guide: PS5 DualSense Stick Drift Fix and Xbox Series X/S Stick Drift Fix.
Should I use calibration or deadzone for drift? Calibration if the offset is consistent and repeatable, because it resets centre; deadzone if you need a temporary bridge that hides small input, knowing it reduces fine aim precision; neither repairs worn hardware.
Why does my controller drift more over Bluetooth? Bluetooth does not wear the potentiometer, but wireless jitter can make a borderline reading look worse; retest wired as the control.
Do Hall effect controllers get stick drift? Far more resistant, because magnets do not wear a carbon track the same way, but they can still be miscalibrated or have deadzone issues; test the actual stick, do not trust the badge.
Can I test stick drift on my phone? Use a desktop browser for the clean result. Test in Chrome or Edge on desktop, with the controller flat and untouched. Safari and mobile browsers have limited Gamepad API support, so a phone result is harder to trust on its own.
Next steps
If mild drift, do the clean and calibrate check first, then use the smallest stable deadzone that hides the movement, retest and monitor. The full deadzone guide shows how to set the smallest stable value per stick.
If clear drift, move to the repair vs replace decision. Clean and calibrate first, always. Then decide on module repair versus replacement based on warranty, cost, and whether other faults are present. The full repair vs replace guide is a future post, named in text only, with no link, until it is published. Do not open the controller on the basis of this how-to alone, and check warranty before opening anything.
If both sticks fail, or other faults appear alongside drift, run Gamepad Health Checker for a full screening. Other faults include buttons not registering, triggers not reaching full pull, and vibration missing. Do this before you buy anything. A drift result alone does not explain every fault.
If the stick moves with hands off, the diagnosis post names the cause from the pattern.